1-to-1 iPad ePortfolio solution

Today @j_allen asked how we handled eportfolio’s at Anastasis Academy.  The 140 characters of Twitter felt a little too limiting to explain the hows and whys of what we do…bring on the blog post!

Anastasis has a one-to-one iPad program.  Our students own their iPads in a modified BYOD (bring your own device) setup.  I say modified because we requested what device they brought.  The iPad was the ONLY supply on our supply list. Anastasis supplies all other materials (pencils, papers, crayons, markers, paint, glue, etc.).  This has been a fantastic setup for us.  Families are in charge of keeping the iPads in working order, synced with the student iTunes account and charged for class.  We made the decision not to own the iPads as a school to keep costs low for technical support, replacement of broken or out-dated devices and so that our students could take ownership over their own devices.  Students can add any apps to the iPad at home using their own iTunes account.  As a school, we purchase curricular and productivity apps for students.  Students download these apps using redeem codes so that they can stay signed into their own iTunes account.

Anastasis has 60 students in 1st through 8th grade.  At the beginning of the school year, we sent home a list of recommended restrictions for parents to set up on student iPads.  We taught families how to enable parent restrictions on the Internet, movie/app/song ratings, and how to block in app purchases.  We asked all parents to restrict student access to Safari.  At school, we downloaded the MobiCip app to every iPad so that we could filter the Internet.  MobiCip allows us to set up broad category filters based on age. A premium MobiCip account lets us filter exactly what we want to and allow those sites we want to.  (For those who are wondering our students do have access to YouTube.) 🙂

I digress…the question was about ePortfolios.

We use a combination of Evernote, Edu 2.0 and Edublogs to keep and share our work.  Evernote has been a fantastic app for our students.  Students can record text, images, and audio directly in Evernote.  Each note can be emailed to teachers and parents.  A link can also be generated for each note making them easy to share on blogs.  Better yet? There are SO many apps that have the ability to share with Evernote.  Very handy.  Students do quite a bit of writing directly in Evernote.  This is a good place for all of student writing (even those pieces they don’t want to, or aren’t ready to, share).  Evernote makes it easy to organize all of their notes into notebooks (the learning curve here is teaching students to use some organization).  The ability to record audio and take pictures of their work in Evernote is great.  This means that students can capture learning that isn’t natively digital-digitally.  All of those awesome inquiry projects that they construct and build can be captured and reflected on in Evernote.  Another HUGE benefit to the Evernote/iPad combo: it goes with them everywhere.  Recording learning on a field trip? Check. Recording learning at home? Check. Recording learning on the fly? Check. Teachers often send students a PDF instructions for an assignment or a picture to the student’s Evernote account. Parents can login to their child’s Evernote account from any computer or iDevice to see what they are working on.

Edu 2.0 is our education portal.  In Edu 2.0 we can share things as a school community.  Edu 2.0 has a built in e-portfolio (we don’t often use this), a blog, a post feed, calendar, and message system.  Edu 2.0 makes it easy for us to stay connected as a school community.  Because we teach young students, this “walled” community is a safe place for students to share any, and all, of their work and thoughts.  Students often write blog posts in Edu 2.0 about their learning.  Other students, parents and teachers can comment on the Edu 2.0 blog posts.  Teachers use Edu 2.0 to send students assignments, make class announcements and communicate quickly with parents in their classroom.  Students can link any content from their Evernote account to their blog in Edu 2.0 to share it with other students, parents or teachers.  The school calendar is updated with all birthdays, learning excursions and school events so that students, parents and teachers are always up-to-date.  The live post feed makes it easy for teachers and administration to make school-wide announcements.  This feed shows up on the home page of every student, parent and teacher.

Each of our teachers has a class Edublog.  This is where the teachers write blog posts about the happenings in their classrooms.  Students can also contribute to the class blogs to get input and comments from a global audience.  The Edublog is the place for interaction and collaboration with the world.

We have a school YouTube account where students can upload videos and stop motion animations.  The school account has become a nice central place for students to share their work with the world.  I act as administrator on the YouTube channel so that I can moderate comments and videos.  Students can easily link to, or embed, videos they have created in Evernote, on their Edu 2.0 blog or on Edublogs.

This combination of tools has worked well as an ePortfolio for student work. I love that at the end of the school year students have ALL of their work with them.  Because they own their iPads, the Evernote content goes with them.  Even without the iPad, students can access their Evernote account from anywhere and continue using it.

Do you have a one to one program?  I would love to hear your solutions for an ePortfolio!

Encyclopedia of Life: podcasts, videos, images, activities

What it is:  The Encyclopedia of Life (eol) is a beautiful website that celebrates the biodiversity of life.  On the eol website, find podcasts where students can discover the diversity of life five minutes and one species at a time.  Students can dig deeper into their learning with extra features like “Meet the Scientist”, “Educational Materials” or “Extras”.  The “Extras” include Google Earth tours, videos, audio out-takes, images and contributions from listeners.  Podcasts can be subscribed to via RSS or iTunes.  The Encyclopedia of Life even provides a podcast guide for educators to use!

Teachers can create customized “Field Guides” on the eol website.  These guides are collections of text and images from the eol website to fit your classroom needs.

Students can participate in their very own BioBlitz activities where they are led in observation of biodiversity in their own backyard.

The Tools page has great extra interactives and tools for students to use as they learn about life on earth. Find tools such as a Cool Iris eol plugin, Google Earth Species quizzes and Life Desk where students can create and contribute to eol.

How to integrate Encyclopedia of Life into the classroom:  The Encyclopedia of Life is a gorgeous site for students to explore biodiversity.  Students can engage with audio, video, images and activities to learn more about life on Earth.

My favorite part of the site is the BioBlitz activities that lead students through discovering biodiversity in their own backyard.  These activities teach students to be careful observers, respectful of life and encourage curiosity and discovery.  Choose a BioBlitz activity to complete in the school yard with your students.  Use the eol site to learn about the different species you find.  Students will love the image and audio collections here!

Are you studying a specific species in your class? Create your own classroom field guides.  Better yet, put students in charge of this job.  Split students into groups, each group can create a field guide to share with the rest of the class based on a species. 

Tips: You have to login in order to create field guides on the Encyclopedia of Life.  All content can be viewed without a login.

Please leave a comment and share how you are using Encyclopedia of Life in  your classroom!

NASA Eyes on the Solar System: 3D interactive solar system

What it is:   It is no secret that I am a big fan of NASA…I may, in fact, be a space nerd.  It is all so fascinating, mysterious and beautiful.  Whenever I do a space unit with students, I find that I have many kindred spirits.  Space seems to have that effect on all kids. Recently I learned about a new 3D interactive solar system that NASA has introduced thanks to @rmbyrne and his ever-full-of-useful-ideas-blog, Free Technology for TeachersEyes on the Solar System is a 3D environment students can explore that has actual NASA mission data included inside.  Students can ride along with the Juno mission to Jupiter.  The Juno mission seeks to understand the origin and evolution of Jupiter and our solar system.  In the Explore Juno mission, students will learn more about the science, the spacecraft, and the mission with a 3D interactive.  Students can also explore the solar system on their own.

How to integrate Eyes on the Solar System into the classroom:  Eyes on the Solar System is a super awesome way for students to explore our solar system.  Students can choose to join the Juno mission or explore the universe on their own.  This is a GREAT site to share with the whole class on a big screen (projector-connected computer or interactive whiteboard).

With young students, explore the universe together on an interactive whiteboard or projector.  Have students prepare for their space mission and do a launch count down as a class.  Students can take turns being mission astronauts by interacting with the 3D solar system.  Other astronauts can take “official” mission notes and observations at their seats as they wait for their turn as mission first in command.

Eyes on the Solar System makes a great center activity on classroom computers.  During a center rotation, students can each explore a planet or feature of our solar system and then report back to Mission Control (the rest of the class) with their findings.  Assign (or let students each choose) a different feature to study.  When the students come back together as a group, the whole solar system will be represented.  I have had students create “baseball cards” of everything from composers to planets.  Eyes on the Solar System would be a great place for students to start their exploration and research to gather “stats” about a planet.  Students can take a screen shot (on a Mac command+shift +4) of their planet for the front of the card and add the stats to the back of the card using a word processing or publishing program.  Print out a class set of each card and let students trade and collect all of the planets (and special features) of the solar system.

Turn student exploration of the solar system into a creative writing project.  Students can go through the Juno Mission to Jupiter and write a fictional story from Juno’s point of view.  Do you have hesitant writers? What about having students create a graphic novel or comic book about Juno’s adventures through the solar system?

Tips: Be sure to check back to Eyes on the Solar System periodically, new features, tours and news are being added.  “Just like the universe, ‘Eyes on the Solar System’ is expanding.” 🙂

Please leave a comment and share how you are using Eyes on the Solar System in  your classroom!


Inside Story Flashcards: The world’s most interesting way to learn words

What it is:  First of all, how about that for a tagline?  “The world’s most interesting way to learn words” is a lofty goal for anyone to reach, but I must say, Inside Story Flashcards is doing a bang up job of it!  What makes these vocabulary flashcards so great is the accompanying pictures.  They are so appropriate for the words they are describing and offer a great visual to associate with the word.  In addition to the well matched picture, students can click on a speaker icon for audio of the word.  Students can choose to show or hide the definition.  Students can choose words at four different levels: Basic (includes words like seven, comb, typewriter); Easy (includes words like attire, inclined, endorsement); Medium (includes words like prodigy, monochrome, dank) and Hard (includes words like crepuscular, bedizened, atavistic).

The online flashcards are fantastic but there are also free printable flashcards for offline use!

How to integrate Inside Story Flashcards into the classroom:  Inside Story Flashcards are a superb addition to any classroom.  They are just the ticket for visual learners…petrified will forever more be associated with the kitten picture above in my mind!  These flashcards are a fun way to practice vocabulary and learn a new word.

Use the site with the whole class using a projector-connected computer or an interactive whiteboard.  Split students into teams to see which team can come up with the most creative sentence using the new vocabulary word.  The online flashcards also make a great creative writing prompt.  Students can use the newly learned vocabulary in connection with the picture displayed.

Students can practice their vocabulary skills on classroom computers using the “hide definition” feature.  Students can quiz themselves and then show the definition to find out if they are correct.

The print flashcards can be used in the low tech or no tech classroom.  Print out flashcards to keep in a writing inspiration station.  Students can use them to learn new vocabulary or to inspire writing.

Start your day with a new word.  This can be the “word of the day”, challenge students to use the word of the day in conversation at some point during the day.

Do you have students who are gearing up for the SATs?  Send this link home for some fun practice/learning time.

Tips: At Inside Story Flashcards, you can also purchase sets of flashcards with a theme.  I’m liking the cat and dog flashcards.  Can Haz vocabulary.

**For those who are wondering, I did write this post on my iPad.  It was not wicked hard…just different.

Please leave a comment and share how you are using Inside Story Flashcards in  your classroom!

Writing Prompts Tumblr

What it is:    Writing Prompts  is a Tumblr blog I learned about from @johntspencer on Twitter this morning.  It is a fabulous blog packed FULL of writing prompts to use in the classroom.  There are currently 247 prompts on the site but new prompts are added regularly (so subscribe to this one!).  The prompts are pictures coupled with a text prompt and are sure to get the creative writing juices of your students flowing.

How to integrate Writing Prompts into the classroom:  These Writing Prompts are a fantastic way to get your students thinking outside of the box and interested in writing.   Display prompts on an interactive whiteboard, projector connected computer, or at a writing center on classroom computers.  Students can spend 15-20 minutes of uninterrupted time just writing their thoughts.  Keep these in a journal so that they can go back through their writing and choose a 15 minute piece they would like to expand on.

A blog is the ideal platform for writing of this kind because students can re-blog the prompt along with their written piece.  Students can get feedback from teachers and peers in the form of comments on the blog.

The Writing Prompt Tumblr blog is the perfect addition to a classroom or student RSS reader.  New posts will be delivered as they are posted so your students will always have a fresh supply of writing inspiration.  I use Google Reader when I am at a computer, Reeder or Flipboard on the iPad.

Tips:  These prompts are best for secondary elementary, middle and high school students.  If you teach younger students, consider creating a writing prompt Tumblr of your own.  They are easy to get started with!

Please leave a comment and share how you are using Writing Prompts in  your classroom!

Thinking Blocks: Model math word problems with virtual mantipulatives

What it is:  Thinking Blocks is a great find by @matthewquigley who was nice enough to share his find and let me take the credit (I may have made up that last part…).  Thinking Blocks lets students model and solve math word problems by using online virtual blocks to visualize the problems in new ways.  Thinking Blocks includes blocks to model addition and subtraction, multiplication and division, fractions, and ratios.  On the Modeling Tools tab, students will find modeling tool videos on addition and subtraction, multiplication and division, fractions, ratios, decimals and percents, and algebra.  These thinking blocks were developed by Colleen King as she worked to help her students in their Singapore Math program.  While the concept of modeling word problems with the blocks is most closely associated with Singapore Math curriculum, it can be used to support any math program and is especially helpful to use with visual learners.  Students can use virtual blocks to model known and unknown quantities.  By modeling in this way, students are better prepared for moving from arithmetic to algebraic thinking because they learn how to break complex problems into their simplest form.   The activities on the Thinking Block website includes guided and independent practice opportunities.  The tutorials can be used for guided instruction.  Videos show worked examples from each section (addition, multiplication, division, fractions and ratios.  Progress tracking is built-in (currently this is only per session but the site notes that sometime in September this should be included for multiple sessions).  The Modeling Tool lends itself to independent practice.  Students can choose from hundreds of built-in word problems or enter their own.  Dynamically generated models let students check their own work.  A full screen option is included for use on interactive whiteboards.

How to integrate Thinking Blocks into the classroom:  Thinking Blocks is a wonderful website for exploring and demonstrating understanding of word problems.  Visual students will be keen on the ability to visualize math in this way, using the virtual blocks to represent word problems.  Because Thinking Blocks addresses so many different math disciplines, it is a great way to differentiate instruction for students at a variety of levels.

Thinking Blocks can be used with the whole class using an interactive whiteboard or projector-connected computer.  Students can take turns working out word problems on the whiteboard while students at their seats work to arrive at a common solution.  Students at the board can “phone a friend” if they need a little extra help or guidance.

Thinking Blocks would make a fantastic center activity on classroom computers.  Students could visit the center to practice some word problems and record a reflection about how the blocks enabled them to visualize the problem differently.

Be sure to bookmark Thinking Blocks on school computers and let parents know to bookmark the site at home.  I suspect this site could be a life saver for MANY students (I would have been one of them!)

Tips: You can adjust the difficulty of each model by adjusting the numbers addressed before students begin an activity.

Please leave a comment and share how you are using Thinking Blocks in  your classroom!

Presenting Learning with Stop Motion Animation

What it is:  At Anastasis Academy, we have some Stop Motion Animation PROS in the form of an eight year and ten-year old boy.  These brothers taught themselves how to use stop motion animation, proceeded to create several learning videos (without assistance from a teacher) and, if that wasn’t enough, went on to teach the rest of our students how to do it!  Incredible.  Nothing like starting the day with a little viral learning!  Today these two young boys stood before our junior high students (twelve to fourteen year olds) and taught them how to make a stop motion animation video.  The young boys are SO proud of their accomplishment and were incredibly articulate as they taught the older kids about stop motion, the programs that can be used for stop motion and talked about technique.  The older students followed along as the boys led them step-by-step through creating their own short stop motion video with a pencil or shoe.  The ten-year old then issued the jr. high a challenge: Create a stop motion video before the end of the school day to show me, I’ll give you tips on what you can improve on.  Above is one of the jr. high created videos that was presented.  It was incredible to stand back and watch kids teaching and leading kids this way.  The age difference was no barrier today!

Today, our students used the iMotion HD app on the iPad to create their stop motion animations.  This FREE app is powerful in the hands of creative kids!  The brothers have been using stop motion regularly to reflect on, or display learning.

The older of the two brother’s started learning stop motion using SMA (Stop Motion Animator) this is a free program that works using a PC, webcam and a whole-lotta (technical term) imagination.

For the Linux crowd, there is the free Stop Motion.

For the Mac crowd (cheers), there is the free Jelly Cam.

How to integrate Stop Motion into the classroom:  Stop Motion is a great way for students to create their own animated videos.  Students can use stop motion to display learning, as a way to reflect on learning, to tell a story, to demonstrate a time-lapse of a scientific process or just as a creative outlet.  Stop motion requires students to do some pre-planning.  First students have to decide what story they are trying to tell, next they have to decide how they are going to demonstrate that story visually, finally they need to move an “actor” frame by frame through the scene.  The results are pretty incredible (as you can see above).

Tips:Some tips from our Stop Motion PROS: Make sure not to move your actor too far each time or the end result will be choppy, make sure to move your hand out of the shot before snapping the picture, plan through your story BEFORE you start.

Check out our YouTube channel for more stop motion animation from our students.  The Bones, Gnome.Eaten.By.Jaws, and Anastasis Academy videos were all created by the 8-year-old! (P.S. The kids LOVE comments on their videos!)

This, my friends, is what happens when you give kids room to learn!  Onward.

Please leave a comment and share how you are using Stop Motion Animation in  your classroom!

Paper Toys: Architecture to print and build

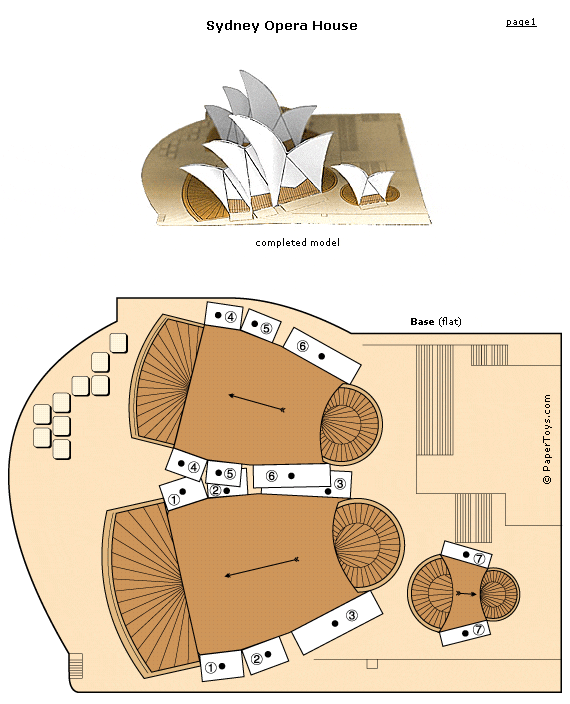
What it is:  At Anastasis Academy we have several kids who are absolutely crazy for architecture.  Not only can they emphatically tell you that they want to be an architect when they grow up, they collect architecture Lego models, will tell you how they wish they could go back in history to meet Frank Lloyd Wright and will build and draw models any chance they get.  These are elementary students!  Today when I came across these Paper Toy models of famous architecture, I knew I would have to share with our students and, while I was at it, would share with all of you who may have your own budding architects!

On Paper Toys you can find and print paper models for:

How to integrate Paper Toys Architecture Models into the classroom: In addition to instantly reaching hero status among your architecture crowd, the Paper Toys Architecture Models is a great addition to the math, history and art classroom.   Students can put the models together digging into the different architecture styles, mathematical models represented by the architecture, and the history of the architecture.  Students can print and build the models (a great exercise in patience, perseverance and attention to detail).  Next students can attach their finished model to a base where they can surround it with math, art or history details they learned about the building to the base.  If they really want to get creative, they can twirl and swirl the words around using different color markers to create an informative landscape.

Students can dig in further and map the various models on a Google map.  If several students are creating models, they can compare and contrast architecture from different time periods, different geographic regions and identify the origins of the type of architecture.

Tips:  Be sure to check out the other Paper Toy models. Your students can build cars, monuments and much more.  New models are added every month!

Please leave a comment and share how you are using Paper Toy Models in  your classroom!

Flake Pad: Create geometric, symmetrical shapes

What it is:  Flake Pad is a very simple little website that lets students create geometric snowflakes using basic shapes and a grid.  To make their flake, students choose a shape and click a spot on the grid.  Students can add as many or as few shapes as they would like to their flake. When they are done the flake can be viewed off of the grid for a screen shot that can be included in other projects or it can be printed off.  I like Flake Pad because it gives students space to be creative and can be used to teach and practice symmetry.

How to integrate Flake Pad into the classroom:  Flake Pad is a great little site to help students understand symmetry.  Any time students click a space on the grid, the shape is added to multiple points on the grid.  Use Flake Pad on an interactive whiteboard or projector-connected computer where students can identify lines of symmetry on the flake that the whole class can see. With the pointer tool on Flake Pad, students can drag the shapes they have created to different points.  Have students in the audience describe what happens to the flake as the shapes are moved.  Do the lines of symmetry change?

Flake Pad can be used on classroom computers as a center activity.  Students can create their own flake, print the flake out and draw the various lines of symmetry with a ruler.

Use Flake Pad during a unit on weather.  Students can experiment with creating their own snow flake, print the flake out and use the print out to list characteristics of snow, or snow related vocabulary along any straight lines on their flake.

Tips: Flake Pad works from the Safari browser on an iPad….mostly. The line shape doesn’t work.  Students could still create their own flakes, print and add lines with a pencil…further practicing their understanding of symmetry!

Please leave a comment and share how you are using Flake Pad in  your classroom!

Learning Box Base 10 Blocks: Virtual math manipulative

What it is:  Today while I was doing a quick Google search for a place I could buy a set of base 10 blocks, I came across this AWESOME digital version by accident.  What a happy accident!  Learning Box has a virtual version of base 10 blocks that builds in a fun practice game.  Students are given a target number and drag base 10 blocks onto the paper to represent that number.  As students add blocks, a counter at the bottom of the page shows how many blocks are currently on the paper.  This is a great way for students to digitally practice place value, counting by hundreds, tens and ones.

The outcome of my shopping trip for base 10 blocks: the digital version is MUCH cheaper (read:free) than the physical version (not free).  While I understand the value of the physical blocks, the digital version is a fantastic alternative for classrooms without the budget for each student to have a set or for students to continue practice at home.

How to integrate Learning Box Base 10 into the classroom:  The Learning Box Base 10 blocks are a great example of a virtual manipulative.  They help students visually represent numbers and place value.  I like the way the slider and cups on the bottom of the page help track student progress as they drag blocks to the paper. When students get the target number, they don’t start with a blank slate, instead a new target number is given and students have to figure out which blocks to add or subtract. You can adjust the level of difficulty and place values practiced by clicking on the 1, 10, and 100 circle to the left of the paper.

Learning Box Base 10 would make a great center activity in the one or two computer classroom.  Students can use the digital manipulatives with the built in game or to help them represent real-world problems.

Start a whole-class game with the Learning Box Base 10 blocks using a projector-connected computer or interactive whiteboard.  Students can take turns at the board solving the problem and “phone a friend” if they need some additional support.

Tips: This Learning Box activity is flash based…I’m hoping that someone comes out with an app of manipulatives for the iPad (hint, hint).

Please leave a comment and share how you are using Learning Box Base 10 Blocks in  your classroom!